x
Photography tips
Simple tips to improve your photography. Find out about a simple three-step approach to taking pictures: see, select, shoot.
Introduction
Have you ever taken pictures that didn't capture what you saw? If so, have you ever wondered what went wrong? This article looks at simple techniques guaranteed to produce good pictures whatever camera and lenses you have.
Taking a picture has three steps:
- seeing something and deciding to take a picture. Whatever it is, if it draws your attention and interests you, there is a good picture just waiting to be taken.
- selecting what to include in the picture, what to exclude, and where to position the main points of interest. You might also need to anticipate movement; for example, wait for someone or something to move to just the right place.
- shooting the picture. This is the moment the camera's film or sensor is exposed to the light coming through the lens. It's purely a mechanical operation that, with today's automatic cameras, is very likely to produce a picture that's in focus and exposed correctly.
Where, then, do things go wrong? Usually during step two, selecting — the part between thinking 'I'll take a picture of that' and pressing the button.
Will your picture capture the moment? Will it have impact? Will you want to frame it and hang it on a wall? Or is it destined to languish at the bottom of a drawer and never see daylight again? The answers depend on the decisions you make just before taking the picture.
Techniques
OK, you've seen something interesting and decided to photograph it. It could be a person, a landscape, or a building. Stop and remind yourself exactly why you want to take the picture.
If you're photographing a person, it's likely that you are attracted by an expression, or clothing, or what the person is doing. For other subjects, it might be a striking combination of colours: maybe a white church contrasted against a blue sky, or a red house isolated on a green hillside.
There are thousands of things that could catch your eye. But whatever it is, you must ensure that the picture captures it. So, keep the picture's purpose firmly in your mind while you do the following:
- find the best viewpoint, remembering that this usually involves moving your feet. Don't forget you can often simply walk closer to your subject. Similarly, moving a short distance left or right can bring big improvements. Even for views, it's surprising how different the picture looks if you are prepared to walk twenty or thirty yards. Also, try bending your knees to investigate a low viewpoint.
- exclude from the picture anything that detracts from what you want to capture. Many potentially good pictures are spoilt by unwanted items that draw the eye away from the picture's real subject. For pictures of people or animals, backgrounds are a common trap — they must enhance the subject, not compete for attention with it. If you can pose your subjects, you should be able to avoid this problem. If not, walk round the subject to find the best viewpoint.
- include in the picture the things that contribute to what you want to capture. For views, you usually have to overcome an obstacle: you see the view in three dimensions but your picture will be only two-dimensional. This often results in pictures that, as we say, lack depth. The good news is that you can do things that will make a two-dimensional picture appear three-dimensional. There are two main techniques. One is to make sure that the picture has something in the foreground, the middle ground, and the background. The other is to have diagonal lines running into the picture; for example, footpaths, rivers, sides of buildings. See the Gallery for examples.
- arrange the things in the picture to achieve balance and/or impact. Note that the centre of the picture is not the best place to put an important feature.
 Instead, imagine that the picture is divided into thirds both horizontally and vertically by lines, as shown in the diagrams.
For a linear feature in the picture, such as the horizon, it's best to put it on one of these lines. For a point feature, it's best to put it where two of the lines intersect. See the Gallery for examples. Also, don't forget to check how the picture looks when you turn the camera to an upright position.
These techniques will provide a solid foundation for your photography but they are not rules to be followed slavishly for every picture — many striking pictures do not follow the advice given.
Gallery
Here are four pictures that demonstrate the points made in this article:
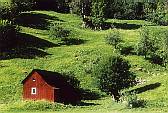 |
Here, it was the contrast between the red and the shades of green that interested me. There was a bright blue sky but it was too dominant, so I excluded it. Note that the building is carefully placed at an intersection of thirds. |
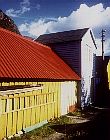 |
Colours like these beg to be photographed. But it needs a bit of thought to make the most of such an opportunity. I put the apex of the blue hut at an intersection of thirds. The viewer's eye is led to this point by the diagonal lines of the front building, making the picture appear three-dimensional. |
 |
It was important to make sure that this picture appeared three-dimensional. I included part of a building to provide a foreground that would work with the features in the middle ground and background. The impression of depth is enhanced by the diagonal part of the white wall. |
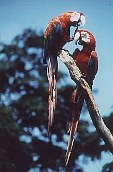 |
The most important point here was to get a clear background behind the birds' heads. I achieved it by kneeling down and using a low viewpoint. I was also able to put the birds' heads at an intersection of thirds. |
Armchair photography
Hopefully, these tips have made you want to go out and take better pictures, but it's possible to try out some of the ideas without moving from your armchair. Get out the last set of pictures you took, look at each one, and ask yourself why you took the picture. Well, does the picture capture what you saw? If not, you should now be able to decide why.
You can also have a go at removing things and moving a feature to a different position: get four strips of cardboard and overlay them on a picture to create new edges and so find a picture within a picture. If you come up with something better than the original, that's what you want to see in the viewfinder next time.
The techniques I have described soon become second nature. They are almost certain to improve your holiday snaps, and you might even get hooked on a fascinating hobby.
x